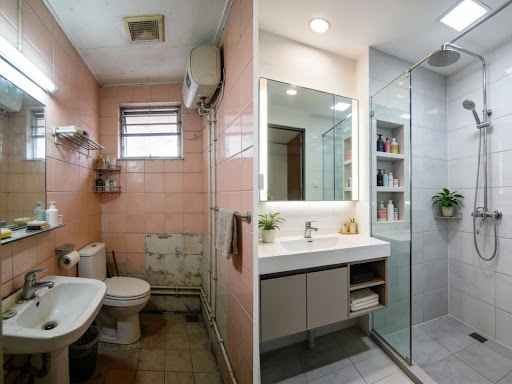
Last year, my cousin finally tackled her 20 year old bathroom in her Ang Mo Kio flat. The tiles had that distinctive 1990s peach and mint color scheme, the grout had turned permanently grey despite endless scrubbing, and the shower leaked just enough to create a perpetual damp spot on the ceiling below. She put it off for years because bathroom renovations seemed overwhelming, expensive, and disruptive.
Three months later, she called me over to see the finished result. I honestly didn’t recognize the space. Same 3 by 2 meter footprint, but it felt twice as large. Bright, clean, functional, and absolutely nothing like the dated bathroom I remembered. More importantly, she walked me through every decision she’d made, every mistake she’d avoided, and every dollar she’d spent.
That conversation inspired me to dig deeper into what makes HDB bathroom renovations successful versus those that end up as expensive regrets.
Why HDB Bathrooms Present Unique Challenges
HDB bathrooms are small. Like, really small. A typical common bathroom measures maybe 1.5 by 2 meters. The master bathroom might stretch to 2 by 2.5 meters if you’re lucky. Older flats have even tighter spaces. Within these compact dimensions, you need to fit a toilet bowl, sink, shower, storage, and somehow make it feel comfortable rather than claustrophobic.
The concrete construction of HDB flats creates its own complications. Hacking through concrete walls generates dust that gets everywhere, despite contractors’ best efforts with plastic sheeting. The structural limitations mean you can’t just knock down walls or relocate plumbing wherever you want. Water pipes and waste lines follow specific routes through the building, constraining your layout options.
Humidity is relentless in Singapore. Bathrooms stay damp even with ventilation. This constant moisture wreaks havoc on materials not suited to tropical climates. I’ve seen wooden vanities warp within two years, paint peel off walls, and metal fixtures rust despite being advertised as “corrosion resistant.”
Then there’s the downstairs neighbor factor. Any waterproofing failure in your bathroom becomes their ceiling problem. The potential for disputes and repair costs makes proper waterproofing absolutely critical, not optional.
What Actually Happens During a Bathroom Renovation
Most people don’t realize how disruptive bathroom renovation becomes until they’re living through it. Understanding the process helps set realistic expectations.
Everything starts with hacking. Workers remove existing tiles, fixtures, and sometimes parts of the floor if you’re changing the layout. The noise is intense. Jackhammers breaking through tile and concrete generate vibration you feel throughout the flat. This phase typically takes two to three days and produces mountains of debris.
Next comes waterproofing, possibly the most critical phase that nobody sees once it’s done. Contractors apply multiple coats of waterproofing membrane to floor and walls, especially in wet areas. Proper waterproofing requires drying time between coats. Rushing this step causes problems that might not show up for months or even years.
Floor screeding and wall preparation follow. Workers level the floor with cement screed, creating the proper slope toward the drain. Without correct slope, water pools in corners instead of draining properly. Wall surfaces get smoothed and prepared for tiling.
Tiling takes longer than you’d expect. Quality tile installation requires precision, with consistent spacing and alignment. The adhesive needs curing time. Then comes grouting, which also needs time to dry properly. Rush the timeline and you risk tiles that eventually come loose or grout that cracks prematurely.
Plumbing installation happens once tiles are done. Supply lines for water, waste pipes, fixture mounting. This phase reveals whether your contractor really knows their stuff. Poor plumbing work causes leaks, low water pressure, or drainage issues that require opening up finished work to fix.
Finally, fixture installation and finishing touches. Toilet bowl, sink, shower fittings, mirrors, accessories. The bathroom finally starts looking like a bathroom again rather than a construction zone.
The entire process typically takes four to six weeks for a standard HDB bathroom. Delays happen frequently due to material delivery issues, inspection requirements, or work that takes longer than anticipated.
Design Strategies for Small Spaces
Working with limited square footage requires specific strategies to create bathrooms that feel comfortable rather than cramped.
Light colors expand perceived space dramatically. White, light grey, soft beige. These reflect light and make walls seem farther away. I visited two identical layout bathrooms in the same HDB block. One used dark brown tiles and felt like a cave. The other used white subway tiles and felt spacious and airy, despite having identical dimensions.
Large format tiles reduce visual clutter. Smaller tiles mean more grout lines, which chop up the space visually. Larger tiles create cleaner surfaces with fewer interruptions. My friend used 600 by 300 mm tiles on her bathroom walls instead of the traditional 300 by 300 mm squares. The difference in how spacious it feels is remarkable.
Glass shower screens beat shower curtains hands down for creating openness. Curtains visually divide the bathroom. Glass maintains the sight line across the entire space. Frameless glass costs more but looks cleaner and more modern.
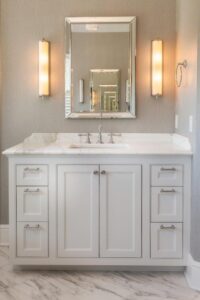
Floating vanities create an illusion of more floor space. When you can see the floor continuing under the vanity, the bathroom feels larger. Plus, floating vanities make cleaning easier since you’re not working around legs or base cabinets.
Strategic mirror placement amplifies light and space. A large mirror above the sink reflects light and creates depth. Some renovations use entire walls of mirror, though this can feel excessive if not done carefully.
Recessed storage keeps necessities accessible without cluttering limited counter space. Built-in niches in shower areas for toiletries, recessed medicine cabinets above sinks. These provide storage without protruding into the room.
Material Selection That Actually Works
Choosing appropriate materials makes the difference between bathrooms that age well and those that deteriorate quickly.
Porcelain tiles outperform ceramic in humid environments. They’re denser, less porous, absorb less water. The price difference is maybe 20 to 30% higher, but porcelain tiles maintain their appearance longer and resist mold growth better. After seeing how ceramic tiles in my own bathroom developed persistent staining after five years, I’d never use them again.
Homogeneous tiles eliminate the grout problem entirely for floors. These large format tiles get laid with minimal grout lines, sometimes as little as 2mm spacing. Less grout means less maintenance and fewer places for mold to grow. They cost more initially but save effort over years of cleaning.
Glass mosaic tiles work beautifully as accent features but become nightmares as full wall coverage. The tiny tiles mean exponentially more grout lines to maintain. Use them as feature walls or borders, not for entire bathrooms.
Quartz or solid surface countertops handle moisture better than natural stone. Granite and marble need regular sealing to prevent staining in bathroom environments. Quartz is non-porous and essentially maintenance free. I’ve watched my sister’s white quartz vanity top resist everything from hair dye to nail polish remover without a single stain.
Stainless steel fixtures resist Singapore’s humidity better than chrome or brass. They cost more but corrode less. Chrome plating eventually breaks down in constant moisture, showing rust spots. Quality stainless steel maintains its finish indefinitely.
Tempered glass for shower screens is non-negotiable. Regular glass can shatter unexpectedly from temperature changes or impacts. Tempered glass crumbles into relatively harmless pieces if it breaks. The safety factor justifies the cost difference.
The Waterproofing Reality
Everyone knows waterproofing matters. Most people don’t realize how much it matters until something goes wrong.
Proper waterproofing extends 300mm up the walls in wet areas, not just the floor. Water splashes, steam condenses, moisture migrates. Waterproofing only the floor leaves walls vulnerable. I know someone who had to redo their entire bathroom after two years because the contractor cut corners on wall waterproofing.
Multiple coats with proper curing time between applications create reliable protection. Each coat needs to dry completely before the next goes on. A professional HDB toilet renovation includes proper waterproofing procedures without cutting corners on drying time, even if it extends the project timeline.
Flood testing verifies waterproofing effectiveness before tiling begins. Workers plug the drain, fill the bathroom with water to about 50mm depth, and wait 24 to 48 hours checking for leaks. Any seepage means the waterproofing failed and needs correction before proceeding. Skipping this test gambles on expensive problems later.
Critical junctions where walls meet floors need extra attention. These corners experience the most stress from building movement and temperature changes. Premium contractors apply additional waterproofing strips or fabric reinforcement at these vulnerable points.
Warranties matter, but only if the company will still exist in five years. A ten year waterproofing warranty sounds great until you realize the contractor operates as a sole proprietorship that might dissolve tomorrow. Established companies with track records provide more meaningful warranty protection.
Ventilation Cannot Be Ignored
Poor ventilation ruins even perfectly renovated bathrooms through persistent moisture problems.
HDB flats typically have either windows or exhaust fans in bathrooms, sometimes both. Windows provide natural ventilation but compromise privacy and require weather consideration. Exhaust fans work regardless of weather but need regular maintenance.
Exhaust fan capacity matters more than people realize. The fan needs to move enough air to actually remove moisture, not just shuffle it around. Calculate bathroom volume and choose fans rated for appropriate air exchange rates. Undersized fans run constantly while accomplishing little.
Regular maintenance keeps exhaust systems working properly. Dust accumulation on fan blades reduces efficiency dramatically. I clean my bathroom exhaust fan every three months by removing the cover and wiping down the blades. Takes maybe ten minutes and noticeably improves performance.
Louvers or vents prevent backdraft when the fan isn’t running. Without these, air from the ventilation shaft can flow back into your bathroom, bringing odors or dust. Quality exhaust fans include backdraft prevention mechanisms.
Running the fan during and after showers removes moisture before it condenses everywhere. My habit is turning on the fan when I turn on the shower, then leaving it running for 15 minutes after I finish. This simple practice keeps mold growth minimal.
Plumbing Upgrades Worth Considering
Old HDB flats often have plumbing that barely meets current demands. Renovation provides opportunity for meaningful improvements.
Replacing old galvanized pipes with stainless steel eliminates rust and corrosion issues. Galvanized pipes eventually rust from inside, restricting water flow and contaminating water supply. If your HDB flat is more than 20 years old, pipe replacement during renovation makes sense.
Instant water heaters for sinks provide hot water without waiting. If your main water heater sits far from the bathroom, you’re running cold water down the drain for 30 seconds every time before hot water arrives. A small instant heater at the sink solves this waste.
Quality shower mixers maintain temperature consistency even when water pressure fluctuates. Cheap mixers give you sudden blasts of cold or scalding water when someone flushes a toilet or runs a tap elsewhere. Thermostatic mixers compensate automatically, maintaining steady temperature.
Pressure balancing valves prevent the sudden temperature shifts that make showering unpleasant. These cost more than standard valves but deliver noticeably better shower experiences.
According to research from the Plumbing-Heating-Cooling Contractors Association, proper plumbing installation and quality fixtures significantly extend the lifespan of bathroom renovations while reducing maintenance requirements.
Storage Solutions for Tiny Bathrooms
HDB bathrooms demand creative storage approaches since dedicated linen closets rarely exist.
Medicine cabinets with mirrored fronts serve double duty. You need a mirror anyway, so having it conceal storage makes perfect sense. Recessed medicine cabinets don’t protrude into the room, maintaining precious space.
Vanity cabinets provide primary storage but design matters. Drawers organize contents better than single cabinet spaces where everything piles up randomly. Soft close mechanisms prevent slamming and feel premium. Water resistant interiors prevent moisture damage.
Corner shelving utilizes otherwise wasted space. Showers and the area above toilets have corners that typically sit empty. Simple glass or tile shelves in these spots add storage without cluttering.
Recessed wall niches in shower areas keep toiletries accessible without ledges that accumulate soap scum. Build these during renovation rather than trying to add them later. Standard depth is about 100mm, enough for most bottles.
Over-toilet storage cabinets maximize vertical space that usually goes unused. The area above the toilet tank provides substantial storage potential. Cabinets here hold towels, extra toilet paper, cleaning supplies.
Towel bars and hooks placed strategically keep towels off limited counter space. Multiple bars at different heights allow towels to dry without overlapping. Heated towel bars add luxury while preventing that perpetual damp towel smell common in humid Singapore.
Lighting Design That Works
Proper lighting transforms bathroom functionality and ambiance.
Layered lighting beats single overhead fixtures. Combine general ambient lighting with task lighting at the mirror and accent lighting for visual interest. This flexibility lets you adjust brightness based on needs.
Mirror lighting eliminates shadows on faces. Lights flanking the mirror or mounted above provide even illumination for grooming tasks. I’ve seen bathrooms with beautiful design but terrible mirror lighting that makes applying makeup or shaving difficult.
LED lights save energy while lasting longer than traditional bulbs. Initial cost is higher but LEDs last 10 to 15 years in typical bathroom use. No more changing bulbs while standing on a stool trying not to slip.
Warm color temperature creates comfortable ambiance while cool color temperature provides clear task lighting. Using 3000K to 3500K for general lighting and 4000K to 4500K for mirror lighting balances comfort with functionality.
Dimmer switches add flexibility, allowing bright light for detailed tasks and softer light for relaxing baths. Not all LED fixtures support dimming, so specify this requirement when selecting lights.
IP ratings indicate moisture resistance. Bathrooms need fixtures rated at least IP44, preferably IP65 for areas near showers. Lower rated fixtures corrode quickly in bathroom environments.
Cost Realities and Budget Planning
Understanding cost breakdowns helps set realistic budgets and identify where money goes.
Basic HDB bathroom renovations typically start around $8,000 to $10,000 for common bathrooms and $10,000 to $15,000 for master bathrooms. This includes hacking, waterproofing, tiling, basic fixtures, and installation. Anything beyond basic specifications increases costs quickly.
Waterproofing represents maybe 10 to 15% of total costs but delivers disproportionate value. Cutting corners here to save a few hundred dollars risks thousands in future repair costs plus damage to neighbor relationships. Always allocate sufficient budget for proper waterproofing.
Tile selection impacts budget significantly. Basic porcelain tiles cost $3 to $5 per square foot. Premium tiles or natural stone can reach $15 to $30 per square foot. For a typical bathroom, tile costs range from $600 for budget options to $3,000 for premium selections.
Fixtures and fittings vary wildly in price. A basic toilet bowl costs $200 to $300. Premium brands with water saving features or bidet functions run $800 to $2,000. Multiply these differences across all fixtures and the budget swings substantially.
Hidden costs catch people unprepared. HDB permit fees, debris disposal, temporary toilet rental if you’re renovating your only bathroom, repairs to adjacent areas affected by renovation work. Budget an extra 10 to 15% beyond quoted prices for these inevitable extras.
Doing some work yourself saves money but requires realistic assessment of skills. Painting is reasonable DIY work. Tiling, plumbing, electrical work? Better left to professionals unless you genuinely know what you’re doing. Bad DIY work costs more to fix than hiring professionals initially.
Choosing Contractors Who Deliver
Contractor selection makes or breaks renovation experiences.
Detailed quotations reveal professionalism levels. Vague quotes with single line items provide no accountability. Detailed quotes breaking down materials, labor, specific brands and models indicate contractors who’ve actually planned the work.
Multiple quotes allow comparison but cheapest rarely means best. I interviewed five contractors for my bathroom. The cheapest quote was 30% below the others. Turned out he planned to use bargain basement materials and skip proper waterproofing procedures. The second cheapest quote came from someone who’d been in business for 18 months. I went with the middle priced contractor who’d operated for 8 years with verifiable references.
Portfolio photos prove capability but verify they’re actual work, not stock images. Ask for addresses of completed projects if possible. I actually visited two bathrooms my contractor had completed. Seeing real results from several years prior provided confidence.
References from recent clients provide honest feedback. Call them, don’t just read written testimonials. Ask specific questions about timeliness, cleanliness, communication, problem resolution, and whether final costs matched quotes.
Contracts protect both parties. Everything verbally discussed should appear in writing: specifications, materials, brands, payment schedule, timeline, warranty terms. Verbal agreements mean nothing when disputes arise.
Payment schedules should align with progress, not favor the contractor excessively. Common structure is 30% deposit, 40% at midpoint, 30% at completion. Paying too much upfront removes contractor incentive to finish promptly or address issues.
Living Through the Renovation
Preparation and realistic expectations reduce stress during renovation.
Protecting the rest of your flat from renovation dust matters. Contractors should seal off the bathroom with plastic sheeting, but dust still escapes. Cover furniture, seal air vents, expect to do extra cleaning even with contractor cleanup.
Alternative bathroom arrangements need planning. If renovating your only bathroom, options include using neighbor or relative’s facilities, renting a portable toilet, or staying elsewhere temporarily. Be realistic about inconvenience.
Daily contractor access means someone needs to be home or you’re providing keys. Some people install temporary locks or work out schedules. I took a week of leave during the most intensive phase when constant access was needed.
Expect noise complaints from neighbors. Warn them in advance about renovation schedule. Small gestures like apologizing beforehand and maybe a small gift maintain goodwill.
Decision fatigue happens when you’re choosing from endless tile options, fixture styles, and finish selections. Narrow choices down before meeting with contractors. Trying to decide between 50 different white tiles while sitting in a showroom is overwhelming.
Maintenance That Preserves Your Investment
Proper maintenance extends renovation lifespan and preserves appearance.
Regular cleaning prevents buildup that becomes difficult to remove. Wiping down tiles and fixtures after daily use takes 30 seconds but prevents soap scum and hard water deposits from forming. I keep a squeegee in the shower and run it over glass screens after every use.
Grout sealing protects against moisture penetration and staining. New grout should be sealed after complete curing, typically 2 to 3 weeks post-installation. Resealing every 1 to 2 years maintains protection.
Ventilation maintenance keeps air moving. Clean exhaust fan covers quarterly, check that drainage holes in windows aren’t blocked, ensure door gaps allow air circulation.
Addressing minor issues immediately prevents major problems. A small amount of caulk that’s separated allows water intrusion that can damage underlying structures. Fixing it takes five minutes and costs nothing. Ignoring it can lead to expensive repairs.
Making Decisions That Last
The best bathroom renovations balance immediate preferences with long term practicality.
Timeless design choices age better than trendy ones. All-white bathrooms looked dated in the 1980s, became trendy again in the 2000s, and currently remain popular. Meanwhile, the turquoise and brown color scheme that was hot in 2015 already looks dated. Classic doesn’t mean boring; it means choices that won’t embarrass you in ten years.
Quality materials cost more initially but less over time. Cheap tiles crack, cheap fixtures corrode, cheap cabinetry warps. Spending 20% more on quality components delivers bathrooms that still look good and function properly after 15 years instead of needing redo after 8.
Functionality trumps aesthetics when conflict arises. A beautiful tile that’s slippery when wet creates safety hazards. A stunning glass vessel sink that splashes water everywhere becomes annoying daily. Choose materials and designs that work, then make them beautiful.
Personal preference matters but consider resale implications. Ultra-specific design choices might reduce property appeal to future buyers. This doesn’t mean designing for generic mass appeal, but avoiding elements that actively turn people off.
Moving Forward
Every bathroom renovation teaches lessons. Sometimes expensive ones. But the transformation from dated, dysfunctional space to modern, efficient bathroom delivers daily quality of life improvements that justify the disruption and expense.
Start with clear priorities. Know what problems you’re solving, what improvements matter most, and where you’ll compromise when budget requires. Research thoroughly before committing. Understand the process, set realistic timelines and budgets, choose contractors carefully.
The bathroom renovation journey is temporary. The improved bathroom lasts years. That perspective helps survive the messy, noisy, disruptive weeks of construction to reach the satisfying result of a space that works properly and looks exactly how you wanted.